Summary
Do you have a need to extend Microsoft Dynamics CRM 2011 and Microsoft Dynamics CRM Online by writing and integrating custom code? Whether you are writing a plug-in or a custom workflow activity, you will use the Plug-in Registration tool, provided in the Microsoft Dynamics CRM SDK, to register your custom code with the Microsoft Dynamics CRM system. This blog complements the documentation in the SDK by providing detailed information on how to use the Plug-in Registration tool to register custom code with Microsoft Dynamics CRM 2011 and Microsoft Dynamics CRM Online. However, registering custom workflow activities with Microsoft Dynamics CRM Online is not supported using the registration tool or any other means.Applies To
Introduction
After you write (or purchase) a plug-in or custom workflow activity, you must register it with Microsoft Dynamics CRM. The Plug-in Registration tool is one of three ways you can register plug-ins and custom workflow activities. The other two methods are: by adding a registered plug-in or custom workflow activity to a solution and installing that solution or by writing custom code that uses the SDK plug-in registration classes. When developing a plug-in or custom workflow activity, the most common registration method is to use the tool. Later when you are ready to package your code for production deployment, you can make use of solutions.
This blog complements the plug-in registration walkthrough provided in the SDK by providing more information about the Plug-in Registration tool itself, where the walkthrough focuses more on the process of plug-in registration. The information in this article applies to all three Microsoft Dynamics CRM deployments: On-premises, IFD, and Online.
Downloading and Building the Tool
The Plug-in Registration tool is provided as a source code sample in the Tools folder of the Microsoft Dynamics CRM SDK download. Review the instructions provided in the Tools/PluginRegistration/Readme.docx file for more information about the tool and instructions on how to build the tool.Connecting to a Microsoft Dynamics CRM Server
The first operation to perform with the tool is to connect to one or more Microsoft Dynamics CRM 2011 and Microsoft Dynamics CRM Online servers. You can do this by selecting the Create New Connection button in the toolbar. |
| Connections Toolbar |
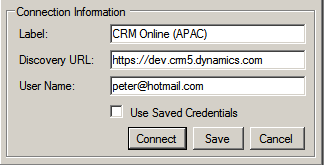 |
| Connection Information |
The Reload Organizations button in the toolbar refreshes the connections list and the Remove Connection button deletes the selected connection from the list.
The Main Window
The main window of the tool is shown in the following figure. Notice that Connections pane has been closed in the figure to conserve space. The Registered Plugins & Custom Workflow Activities list displays assemblies, plug-ins, steps, images, custom workflow activities, and service endpoints that are currently registered with the associated server and organization.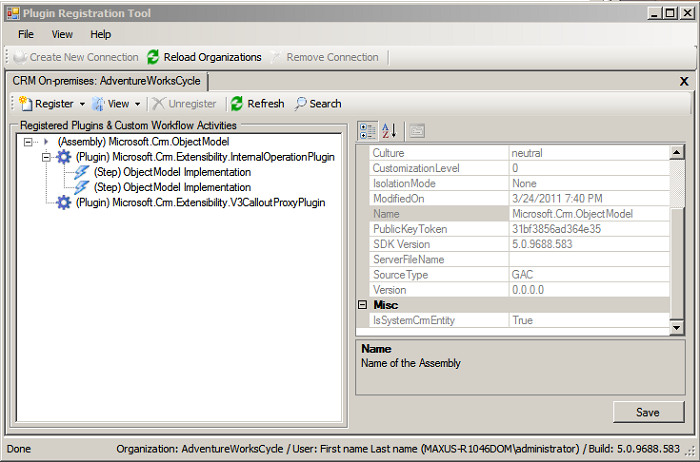 |
| Main window after Connecting to an Organization |
You can expand the nodes in the Registered Plugins & Custom Workflow Activities list and select any list item to view registration information about that selected item. You can change the way the list is displayed, according to assembly, entity, or message, by selecting a view in the View menu.
Registering a Plug-in or Custom Workflow Activity
To register a plug-in or custom workflow activity, you must first register the assembly containing that compiled code. You register an assembly by selecting Register New Assembly in the Register menu and then filling out the dialog box that is displayed.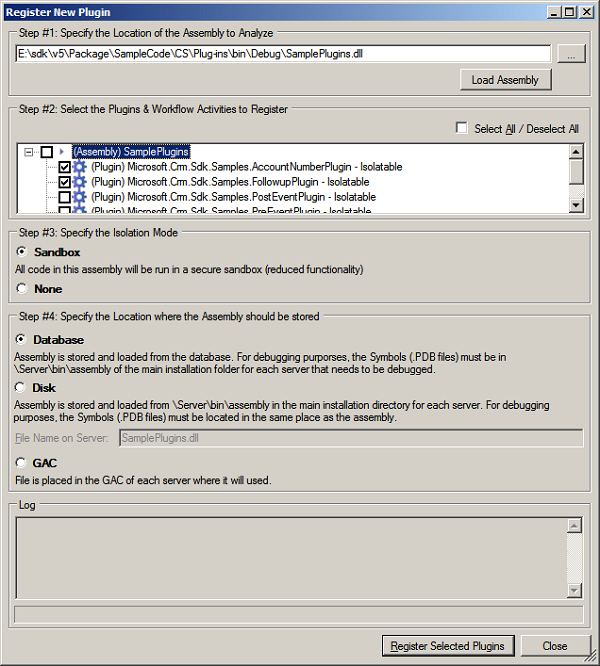 |
| Register New Plug-in Dialog |
In Step #3, check Sandbox to register the selected plug-ins to execute in the sandbox, an isolated run-time environment. Otherwise, select None. Always specify None when registering a custom workflow activity.
In Step #4, specify where on the server you want the plug-in assembly deployed: in the Microsoft Dynamics CRM database, on the server’s disk under <crmwebroot>\server\bin\assembly, or in the GAC. The most commonly specified option is Database while the Disk option is maintained mostly for backward compatibility with Microsoft Dynamics CRM 4.0. If registering your plug-in or custom workflow activity in the database, you can still debug it.
Finally, select Register Selected Plugins. The assembly and selected plug-ins or custom workflow activities are displayed in the Registered Plugins & Custom Workflow Activities list. However, any registered plug-ins will not execute until you register a step for the plug-in as described in the next topic. On the other hand, custom workflow activities are ready to be included in a workflow.
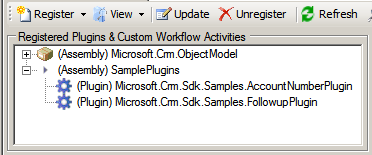 |
| Registered Assembly and Plug-ins |
Registering a Step
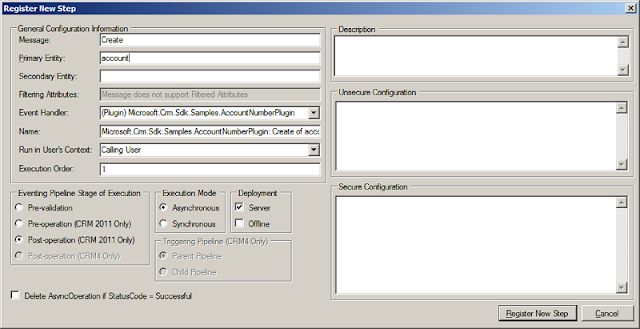
After you have registered an assembly and one or more plug-ins, you can register a step for each plug-in. A step defines when and how you want the plug-in to execute. A plug-in will not execute unless there is one or more steps registered for it.In the view Display by Assembly, select a plug-in in the list and then select Register New Step in the Register menu. The Register New Step dialog box is displayed.
 |
| Register New Step Dialog |
Control Label: Message
Description: The message that must be processed by the Microsoft Dynamics CRM execution pipeline for the plug-in to execute.
Control Label: Primary Entity
Description: The entity that must be processed by the execution pipeline for the plug-in to execute. No entity value in this field indicates any/all entities.
Control Label: Secondary Entity
Description: Some messages require a secondary entity. See the documentation on the specific message for more information.
Control Label: Filtering Attributes
Description: A list of entity attributes that, when changed, cause the plug-in to execute. A value of null causes the plug-in to execute if any of the attributes change. When you specify a message that supports filtering attributes, for example Update, an ellipsis … button is displayed that, when clicked, allows you to select attributes from a list.
Control Label: Event Handler
Description: The plug-in that is to be executed.
Control Label: Name
Description: A name for the step. The tool sets a suggested name in the field automatically, but you can change it.
Control Label: Run in User’s Context
Description: Specify the system account that owns any data changes the plug-in makes. The Calling User is the logged on user that initiated the message to be processed.
Control Label: Execution Order
Description: Specifies the order, also known as rank, that plug-ins are executed within a pipeline stage. Plug-ins registered with an order value of 1 are executed first, followed by plug-ins registered with an order of 2, and so on. However, if there is more than one plug-in in a stage with the same order value, then the plug-in with the earliest compilation date is called first.
Control Label: Eventing Pipeline Stage of Execution
Description: Specifies when you want the plug-in to execute: before (Pre) or after (Post) the core operation that processes the message.
Control Label: Execution Mode
Description: For plug-ins registered to execute in a Post stage, specify if you want them to execute immediately (Synchronous) or queued to execute later (Asynchronous). For post operations, specifying asynchronous execution results in improved system performance as compared to synchronous execution.
Control Label: Deployment
Description: Specify where you want the plug-in deployed: on the server, on the Microsoft Dynamics CRM for Outlook with Offline Access, or both.
Control Label: Triggering Pipeline (CRM4 Only)
Description: For plug-ins developed using the Microsoft Dynamics CRM 4.0 SDK, the plug-ins can execute in one of two supported pipelines: parent and child.
Control Label: Delete AsyncOperation if StatusCode = Successful
Description: When any asynchronous operation completes, a System Job entity is created to record the completion status. You can view these system jobs in the Web application by selecting Settings, and then click System Job. Check this option if you want plug-in related system jobs automatically deleted when the status is successful.
Control Label: Description
Description: A description of the step. Typically, you can describe the purpose of the step for other developers or administrators that might run the registration tool at a later date.
Control Label: Unsecure Configuration, Secure Configuration
Description: If you have written a constructor for the plug-in that takes one or two string arguments, any string values you specify in these fields are passed to the plug-in constructor at run-time.
After you register a step, you will see a new step item under the node of the associated plug-in in the Registered Plugins & Custom Workflow Activities list.
Registering an Image
To register an image, select Register New Image from the Register menu. The Register New Image dialog box is displayed.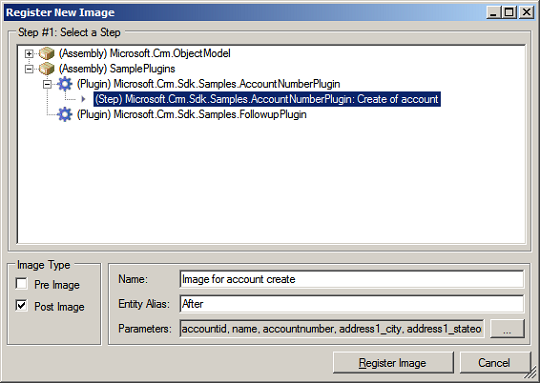 |
| Register New Image Dialog |
Follow these steps to register an image with a step:
- Select an existing step in the list.
- Specify an image type. A pre-image is a snapshot of the entity’s attribute before the core operation. A post-image is a snapshot of the entity’s attribute after the core operation.
- Enter a descriptive name for the image.
- Enter an entity alias. The entity alias value you specify is used by your plug-in code as the key into the image collection.
- Click the ellipsis … button to select the primary entity attributes that should be included in the image. For improved system performance, only select those attributes that you need.
- Click Register Image.
Registering a Windows Azure Endpoint
Step-by-step instructions about how to register a service endpoint, configure Windows Azure AppFabric ACS, and register a plug-in to post the execution context can be found in my blog Microsoft Dynamics CRM 2011 - Register an Azure-Aware Plug-in with Plug-in Registration Tool.
This article provides detailed information about the features of the Plug-in Registration tool and an explanation of the various form fields, settings, and data entry values. The topics covered also provide links to the related SDK documentation for more in-depth research. Try registering some of the sample plug-ins or custom workflow activities provided in the SDK download. Soon, you will be writing and registering your own custom plug-ins or custom workflow activities.
My above blog is based on Microsoft's Official information (by Peter Hecke). Peter Hecke is a programming writer on the Microsoft Dynamics CRM SDK team and is co-author of the SDK since version 1.3.
I hope this blog about 'Microsoft Dynamics CRM 2011 - Using the Plug-in Registration Tool' was informative. Please feel free to leave your comments.
No comments:
Post a Comment